
Table of Contents
Introduction
A staple within the universes of realistic planning and illustration, Adobe Artist could be a capable and versatile piece of the program. There’s continuously something new and interesting to find inside this imaginative powerhouse, whether you are an apprentice fair starting to investigate its potential or an experienced master attempting to make strides in your gifts.
This broad manual will take you through “My 5 Top Adobe Illustrator tips and tricks”. Our objective is to arm you with the information and abilities essential to completely utilize Adobe Artist.
We’ll go deeply into the subtleties of this program, covering everything from accurately arranging your ventures to acing the Write Instrument. Along the course, you’ll find how to utilize underutilized highlights just like the Pathfinder panel, produce astonishing angles, and appreciate the natural offer of the Blob Brush.
But this paper isn’t a how-to direct; it’s moreover an opportunity to progress your imaginative capacities. We’ll walk you through the method of acing outline whereas advertising exhortation is based on our endless information and encounters. You’ll learn valuable easy routes, essential gear, and a thorough comprehension of the conceivable outcomes of the computer program.
We need to grant you the certainty and the capacity to create breathtaking craftsmanship, from complex vector plans to appealing computerized drawings. This manual is your key to victory whether you are a prepared creator wishing to move forward with your exchange or a budding craftsman trusting to progress your capacities.
Thus, without advance ado, let’s start this lighting-up experience and investigate the domain of “My 5 Top Choice Artist Tips, Traps, and Apparatuses.” As we go profoundly into the world of Adobe Artist, be prepared to be motivated, educated, and engaged. Your creative travel begins right now.
1. The Power of Layers
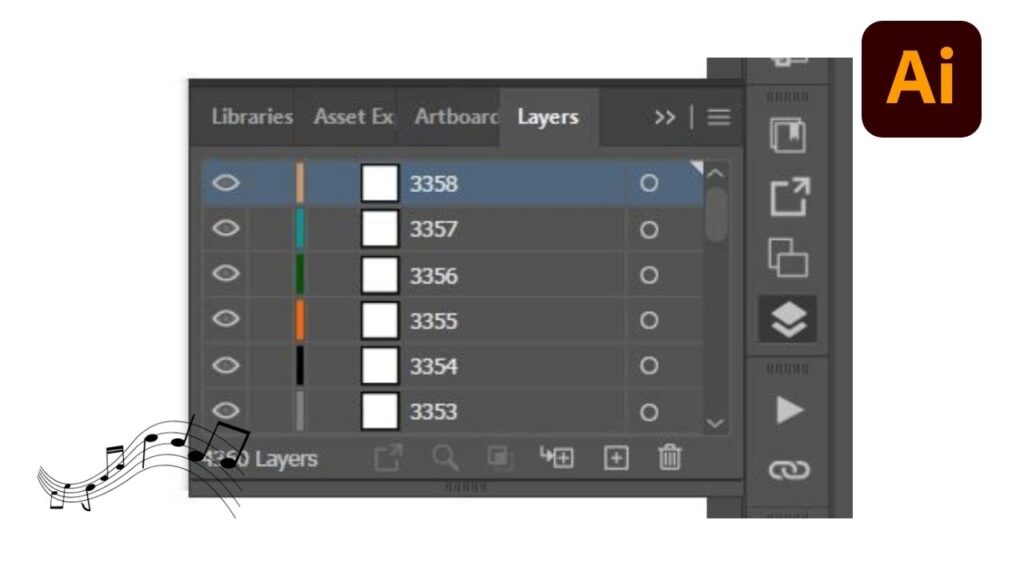
Layers are the spine of any Adobe Artist venture, and understanding how to use their capabilities can essentially upgrade your plan workflow. In this segment, we’ll investigate why layers are fundamental and how to utilize them successfully.
Organizing Your Work of Art
One of the essential capacities of layers is to assist you in organizing your craftsmanship. Envision you’re working on a complex outline with different components like shapes, content, and pictures. Without layers, it would be a chaotic and challenging errand to oversee these components.
By making partitioned layers for distinctive elements of your plan, you’ll be able to maintain order and clarity in your workspace. For this case, you’ll have one layer for the background, another for content, and extra layers for different realistic components. This division makes it simple to choose, alter, and move objects without influencing other parts of your plan.
Naming and Labeling
To maximize the benefits of layers, it’s significant to deliver them important and graphic names. Rather than nonexclusive names like “Layer 1” or “Layer 2,” consider naming your layers agreeing to the substance they contain. For occurrence, you might title a layer “Foundation” for your design’s scenery, “Content” for any content components, and “Outlines” for realistic components.
This hone not as it were disentangles your workflow but makes it simpler to locate specific elements after you have to make changes. It’s a little but essential step in keeping up a well-organized and proficient workspace.
Locking and Visibility
Adobe Artist gives you devices to control the permeability and editability of person layers. You’ll bolt layers to anticipate coincidental changes, guaranteeing that your carefully arranged elements stay undisturbed. Moreover, you’ll be able to flip layer permeability on and off, making it less demanding to center on particular parts of your plan.
For illustration, on the off chance that you’re working on a complex outline and need to concentrate on a specific component, you’ll stow away other layers briefly. This not as it were streamlines your workspace but also speeds up your altering preparation.
Layer Ordering
The arrangement of your layers things, as well. Objects on higher layers will show up before objects on lower layers. By orchestrating layers deliberately, you’ll control the stacking order of elements in your plan. This can be particularly valuable when managing with covering objects or making complex compositions.
To alter the layer arrangement, essentially drag and drop layers within the Layers board to modify them as required.
Console Alternate routes
To work more productively with layers, it’s supportive to familiarize yourself with console easy routes. For this case, squeezing “Ctrl” (or “Cmd” on Mac) and the square bracket keys “[” and “]” permits you to move selected objects up or down within the layer stack rapidly.
By acing these easy routes, you’ll be able to explore layers with ease, advance streamlining your Artist workflow.
2. Mastering the Pen Tool
The Write Device is both an effective and flexible highlight in Adobe Artist and getting to be capable with it is basic for making exact and perplexing vector illustrations. In this segment, we’ll plunge more profound into the Write Tool’s usefulness and give tips to assist you in acing this vital instrument.
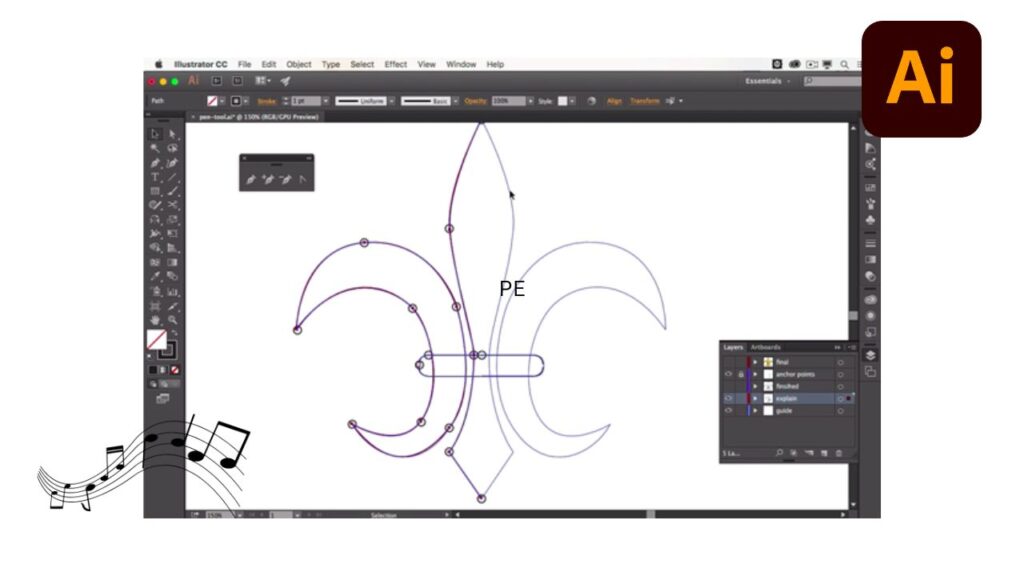
Understanding Stay Focuses
At the center of the Write Tool’s usefulness are grapple focuses. These are the focuses that characterize the way of your lines and shapes. After you press the Write Device, you stay focused, and after you connect these focuses, you shape ways. To form smooth bends or sharp points, you would like to control these grapple focuses successfully.
Smooth Focuses: These stay focuses make smooth, streaming bends between line sections. To form a smooth point, press and drag the grapple point handles to alter the ebb and flow.
Corner Focuses: This grapple focuses on making sharp angles in your ways. To form a corner point, tap without dragging. You’ll be able to change over a smooth point to a corner point by holding down the “Alt” key (or “Alternative” key on Mac) and clicking on it.
Bezier Handles
Bezier handles are the key to creating precise curves with the Pen Tool. They extend from each anchor point and allow you to control the direction and intensity of the curve. Here’s how to work with them:
- Adjusting Handles: To adjust the curve of a path, click and drag the Bezier handles. The length and direction of the handles determine the curvature. Test with distinctive handle positions to form the required bend.
- Symmetrical Handles: To ensure symmetrical curves, you can hold down the “Shift” key while dragging a handle. This constrains the handle’s movement to a 45-degree angle.
- Direct Selection Tool: If you need to fine-tune anchor points or Bezier handles, use the Direct Selection Tool (shortcut “A”). This allows you to select and manipulate individual points and handles.
Creating Complex Shapes
With the Pen Tool, you can create complex shapes by combining straight lines and curves. To create a curved path, click and drag to create a smooth point, then continue by clicking to create corner points. Illustrator will automatically connect these points to form a continuous path.
The Convert Anchor Point Tool
The Convert Anchor Point Tool is a valuable companion to the Pen Tool. It allows you to switch between smooth and corner points effortlessly. To access it, hold down the “Shift” key and press “C.” Clicking on a smooth point with this tool converts it into a corner point and vice versa.
Practice Makes Perfect
Mastering the Pen Tool takes practice. Start with basic shapes and gradually work your way up to more complex illustrations. Consider tracing existing artwork or using reference images to hone your skills. The more you experiment and practice, the more comfortable you’ll become with this essential tool.
Keyboard Shortcuts
To speed up your workflow with the Pen Tool, familiarize yourself with essential keyboard shortcuts:
- “P” activates the Pen Tool.
- “Shift” constrains angles while drawing.
- “Alt” (or “Option” on Mac) converts between smooth and corner points.
- “Ctrl” (or “Cmd” on Mac) allows you to temporarily access the Selection Tool while using the Pen Tool.
3. Utilizing the Pathfinder Panel
The Pathfinder Panel in Adobe Illustrator is a powerful feature that allows you to combine, divide, and manipulate shapes effortlessly. Understanding how to use the Pathfinder Panel effectively can significantly enhance your ability to create complex and unique designs. In this section, we’ll explore the various functions of the Pathfinder Panel and provide practical tips for utilizing it.
Accessing the Pathfinder Panel
You can find the Pathfinder Panel in Illustrator by navigating to the “Window” menu and selecting “Pathfinder.” This panel provides you with a range of options for working with shapes and paths.
Combining Shapes
One of the most common uses of the Pathfinder Panel is to combine shapes. This can be particularly useful when creating custom icons, logos, or complex illustrations.
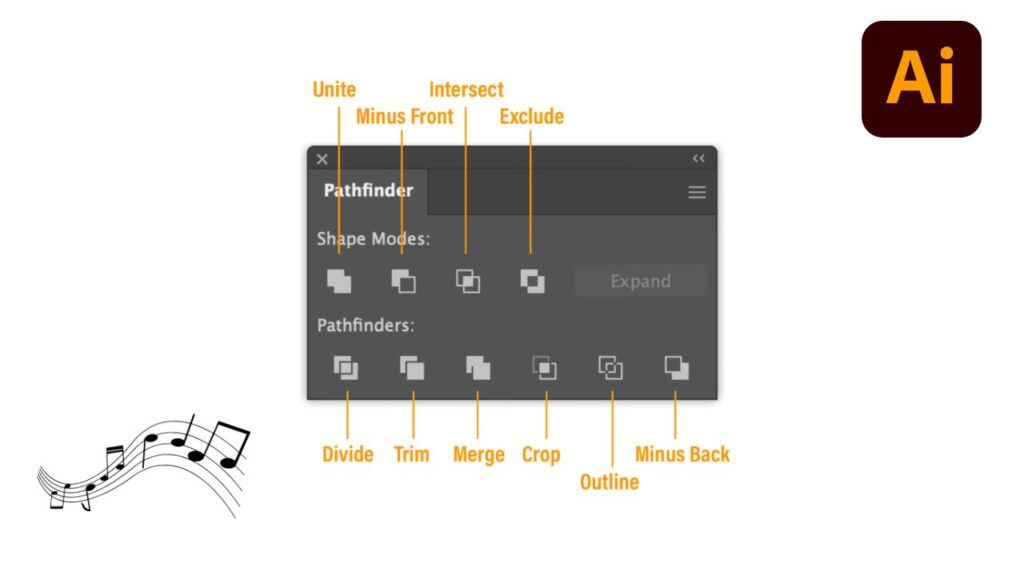
- Union: The “Unite” function combines selected shapes into a single, unified shape. This helps create seamless objects by merging overlapping shapes.
- Minus Front: “Minus Front” subtracts the frontmost shape from the one behind it. This is useful for creating cutouts and removing parts of shapes.
- Intersect: “Intersect” retains only the overlapping area of selected shapes, effectively creating a new shape from the intersection.
- Exclude: “Exclude” removes the overlapping areas of selected shapes, leaving behind non-overlapping sections.
Dividing Shapes
The Pathfinder Panel is also excellent for dividing shapes into smaller sections or creating complex cutouts.
- Divide: The “Divide” function splits selected shapes at their intersections, creating individual pieces. This is particularly useful for creating intricate patterns or dissecting complex shapes.
Working with Compound Paths
The Pathfinder Panel can be used to create compound paths, which are essential for designing logos and complex vector artwork.
- Make Compound Shape: This option combines selected shapes into a single compound path. Compound paths are crucial for creating intricate, overlapping shapes with consistent fills and strokes.
The Pathfinder Effects
In addition to the basic Pathfinder operations, you can also explore the “Pathfinder Effects” section. This section offers more advanced operations, such as adding and subtracting paths based on transparency or blending modes.
Practical Tips
- Group Your Shapes: Before applying Pathfinder operations, it’s a good practice to group your shapes. This ensures that the operations affect the entire group rather than individual objects.
- Use the “Preview” Option: Illustrator allows you to preview the results of Pathfinder operations before applying them. This helps fine-tune your design.
- Explore Shape Modes: Experiment with different shape modes (e.g., Union, Intersect, Minus Front) to achieve the desired effect. Sometimes, combining multiple modes in a single project can yield complex and creative results.
- Save Originals: If you’re unsure about the outcome of a Pathfinder operation, duplicate your shapes and hide them on a separate layer. This way, you can always revert to the original artwork if needed.
4. Working with Gradients
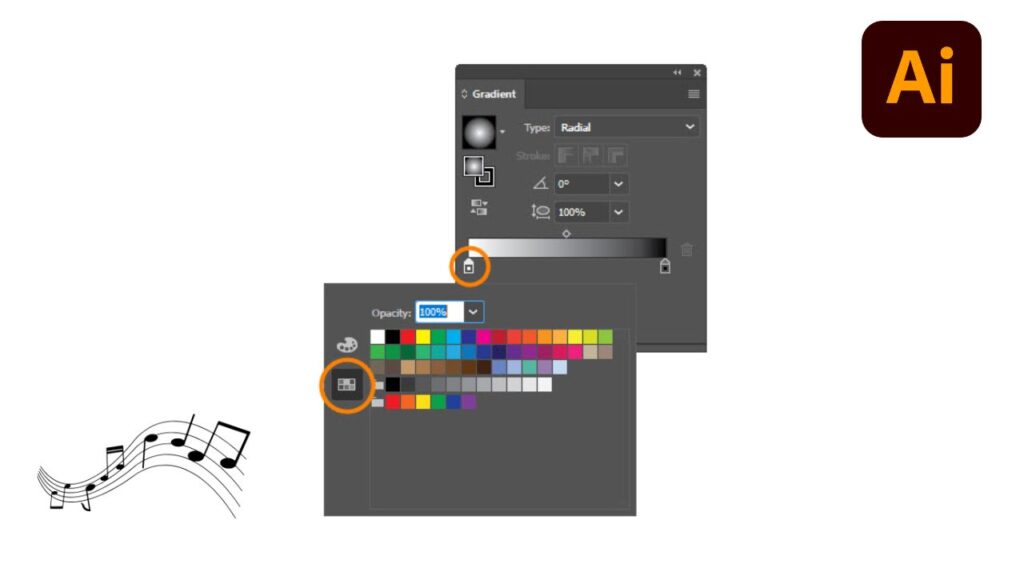
Gradients are a powerful tool in Adobe Illustrator, allowing you to add depth, dimension, and visual interest to your illustrations and designs. In this section, we’ll delve deeper into working with gradients and provide tips and techniques to help you harness their full potential.
Gradient Types
Illustrator offers several gradient types to suit your creative needs:
- Linear Gradient: This type blends colors in a straight line, creating a smooth transition from one color to another. Linear gradients are excellent for adding shading to objects or creating the illusion of light and shadow.
- Radial Gradient: Radial gradients radiate outward from a central point, creating circular or elliptical blends. They are perfect for creating highlights, glows, or vignette effects.
- Angular Gradient: Angular gradients blend colors in a circular pattern, allowing you to create complex and dynamic color transitions. They are ideal for creating metallic or multi-color effects.
- Freeform Gradient: Introduced in newer versions of Illustrator, freeform gradients offer even more control by allowing you to place color points anywhere on an object and adjust their position and intensity individually. This is perfect for creating highly customized gradient effects.
Applying Gradients
To apply gradients to objects in Illustrator, follow these steps:
- Select the object you want to apply the gradient to.
- Open the “Gradient” panel by going to “Window” > “Gradient” if it’s not already visible.
- In the Gradient panel, you can choose a gradient type (linear, radial, angular, or freeform) by clicking on the respective icon.
Editing Gradients
The Gradient panel provides various options for editing and customizing gradients:
- Color Stops: You can add, remove, and adjust color stops along the gradient slider. These stops control the colors and their positions within the gradient.
- Opacity Stops: Similar to color stops, opacity stops allow you to control the transparency of colors within the gradient.
- Angle and Aspect Ratio: For linear gradients, you can adjust the angle and aspect ratio to control the direction and shape of the gradient.
- Location and Intensity: In freeform gradients, you can move color points around the object, adjust their intensity, and even add additional color points for precise control.
Creating Realistic Shading
Gradients are invaluable for creating realistic shading and lighting effects in your illustrations. By strategically placing and adjusting gradient color stops, you can simulate highlights and shadows, giving your objects a three-dimensional appearance.
For example, to create a simple sphere with shading:
- Apply a radial gradient to a circle.
- Place the lightest color stop at the center (highlight) and the darkest color stops at the edge (shadow).
- Adjust the transparency of the shadow color stop to create a smooth transition from light to dark.
Customizing Gradients
Don’t hesitate to experiment with gradient colors, opacities, and shapes to achieve the desired effect. Illustrator provides a wide range of options for customizing gradients, including gradient mesh and blending modes.
Saving and Reusing Gradients
If you create a gradient that you’d like to reuse in other projects, you can save it as a swatch in the Swatches panel. This makes it easy to maintain a consistent color palette across multiple designs.
5. Harnessing the Blob Brush
The Blob Brush is a unique and creative tool in Adobe Illustrator that allows you to create organic, hand-drawn shapes with ease. In this section, we’ll delve deeper into the Blob Brush and provide tips and techniques to help you make the most of its capabilities.
Understanding the Blob Brush
The Blob Brush is like a digital paintbrush that creates filled shapes as you draw. Unlike the standard Pen Tool or Shape tools, which create vector paths, the Blob Brush directly creates filled vector shapes. This makes it perfect for freehand drawing and adding an artistic, hand-drawn touch to your designs.
Basic Usage
To use the Blob Brush:
- Select the Blob Brush tool from the Illustrator toolbox or press “Shift+B.”
- Choose your fill color from the Color panel or Swatches panel.
- Adjust the brush size using the bracket keys “[” and “]” or by right-clicking and selecting a size from the brush options.
Now, start drawing with the Blob Brush. As you draw, the tool will create filled shapes with the selected fill color.
Varying Line Weight
One of the Blob Brush’s unique features is its ability to vary line weight as you draw. By adjusting the pressure or stylus sensitivity of your drawing tablet (if you have one), you can create lines with varying thicknesses, adding a natural and expressive quality to your artwork.
Combining Shapes
The Blob Brush also allows you to easily combine shapes. When you draw over an existing shape with the Blob Brush, the tool automatically merges the new shape with the existing one. This is particularly useful for creating complex, multi-part illustrations.
Customizing the Blob Brush
To get the most out of the Blob Brush, explore its customization options:
- Brush Settings: You can adjust the brush settings in the Brush panel (Window > Brushes). Here, you can fine-tune the brush’s behavior, such as the degree of variation in line weight.
- Opacity: Changing the opacity of the Blob Brush can create subtle, transparent strokes or bold, opaque shapes, depending on your artistic intentions.
- Blending Modes: Experiment with different blending modes to achieve interesting blending effects when drawing over existing shapes.
Simulating Traditional Media
The Blob Brush is an excellent tool for simulating traditional media like ink or watercolor. You can achieve a painterly or illustrative look in your artwork by adjusting the brush settings and opacity.
Practice and Experimentation
To master the Blob Brush, it’s essential to practice and experiment. Use it for sketching, doodling, or adding artistic touches to your designs. Explore how different pressure levels, brush sizes, and opacity settings can impact your creations.
Combining with Other Tools
The Blob Brush works harmoniously with other Illustrator tools. You can create outlines around your filled shapes, add text, or further refine your artwork using the Pen Tool or Shape tools.
CHECK ALSO:- 16 Best Freelance Websites to Find Work
FAQs
Q2. How can I change the text in Illustrator to outlines?
A. Select the text, then choose Type > Create Outlines to turn it into outlines. Thus, the text is transformed into editable vector forms.
Q3. What file types does Illustrator support?
A. Illustrator is compatible with several file types, including AI, EPS, PDF, SVG, and others. Your work may be exported in a variety of formats based on your requirements.
Q4. Is it possible in Illustrator to undo numerous actions?
A. You may go back through several activities using the "Undo History" menu. To undo, select Window.
Q5. Are there any keyboard shortcuts I can use to speed up my Illustrator workflow?
A. Definitely! Many keyboard shortcuts are available in Illustrator to help you work more quickly. These shortcuts can be modified in the Preferences menu.
Q6. In Illustrator, can I deal with 3D objects?
A. Yes, you may use Illustrator's Extrude and Bevel effects to build and modify 3D objects. It's an effective technique for giving your designs dimension.
Conclusion
Mastering Adobe Illustrator is a journey filled with creativity and endless possibilities. By following these tips, and tricks, and using the right tools, you’ll be well on your way to becoming an Illustrator expert. Keep in mind that hone makes culminate, so keep testing and sharpening your aptitudes. Now, go ahead and create amazing artwork with your newfound knowledge of “My 5 Favorite Illustrator Tips, Tricks, and Tools.


