

white background photoshop
In this Photoshop instructional exercise, you may learn how to form a white background in photoshop.
This blog will teach you to use the Select and Mask Workspace to extract the background. You will also learn to use Light wraps and Dodge and Burn layers to enhance the image.
Welcome to our user-friendly direct on how to form a photo’s foundation white in Photoshop. We have everything you need, whether you want to give your images a polished appearance or you just like the clear, uncluttered aspect of a white backdrop.
Transform your pictures quickly by following our detailed instructions.
Table of Contents
Step by Step white background photoshop follow these steps:-
Step 1:-Introduction

You’ll first need to open an image in Photoshop to work with the white background. first, go to the File then open a picture in your document. We’re going to work with the image and our goal is to make a white background.
I’ll go into the new adjustment layer icon and select a solid color. Then, I’ll select white, and press OK. Right-click on it and erase the layer mask if you don’t require one. I’ll rename this layer to the background. We always want to work non-destructively so I’m just going to duplicate this original layer by pressing Ctrl + J and I’m going to drag it up above the background that we just created.
So we’re just going to work with this original copy. In this original layer, I’ll just disable it and keep it there in case we need it again later. I’ll select the original copy and now I’m going to make a selection so, that I can extract the foreground, which is the model from the background.
Step 2:-Quick Selection Tool

One of the best ways of doing this is with Quick Selection Tool. If you’re on photoshop CS6 and older, you can just click and drag around your model to make a selection. But if you’re in photoshop CC, Photoshop CC 2018, or newer, you can go to the select subject button which will use adobe sense, and Adobe’s artificial intelligence to make a selection around the main subject of the image.
I can click and drag and add to the selection. Just make sure that everything that needs to be chosen is selected by clicking and dragging. If you accidentally selected something that shouldn’t be selected like I just did here. You can Alt, click, and drag to subtract from the selection.
Using the Q key on the keyboard will bring up the quick mask mode, where you can see what the mask is choosing. Anything that’s in red will not be selected. If something is improper then select the brush tool and paint with white. Make sure that white is the foreground color and just paint in those pixels.
So I’m painting in the pixels here and I’m holding shift as I click. If you press Q one again after finishing your pick, the selection will return. I’m going to click the hand tool twice. Now we’re going to use the select and mask workspace So I’m going to select the quick selection tool again and go into select and mask. If I click to select and mask, it’ll bring up the select and mask workspace where we can adjust the selection. Cancel it.
Step 3:-Refine Edge

Now that you’ve added a white background to your photo, it’s time to refine your image. The following guidance can assist you in achieving the best results:
Go into select, hold shift, and click on select and mask, it brings up the old refine edge or refine mask dialog box. But everything that we’re going to work with is in this adjusted edge area, with that selection active once again. go and select mask workspace. now I want to smooth the selection so I have a smooth edge. I can just click and drag this to the right to smooth it. I can also add some contrast to make the darker pixels darker and the brighter pixels brighter which makes a sharper edge.
- View Mode: This allows you to preview your selection against different backgrounds. Select the alternative that most closely reflects the reason for which it is implied.
- Edge Detection: This setting helps Photoshop detect the edges of your selection. Try adjusting the Radius and Smart Radius sliders to fine-tune this.
- Adjust Edge: This setting allows you to refine the edges of your selection. You can use the sliders to adjust the Smoothness, Feather, Contrast, and Shift Edge settings.
- Output: This setting determines how you want to output your selection. You can choose to output it as a selection, a layer mask, or a new layer with a mask.
Click OK to make your edits to your choice when you’ve finished. You can now use your selection as desired.
white background photoshop
Step 4:-Drop Shadow
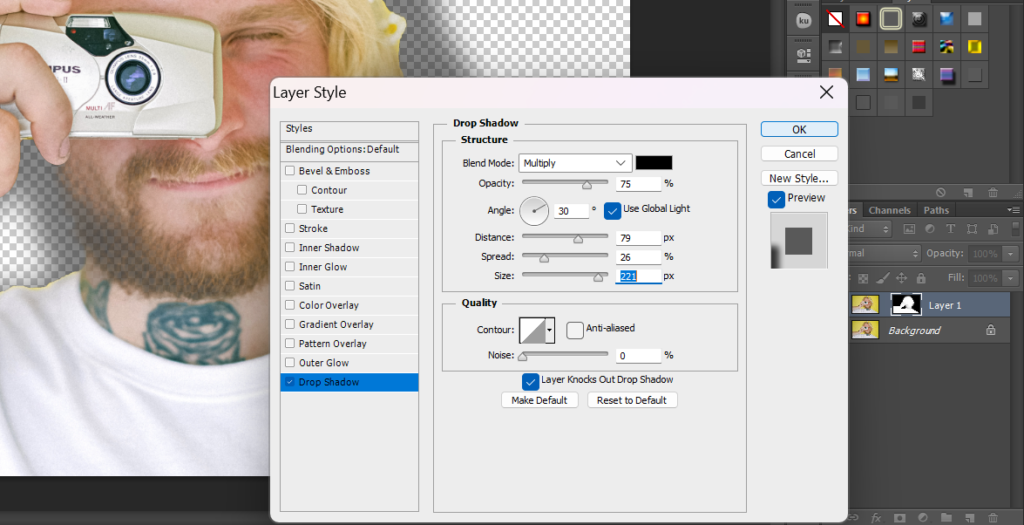
- Choose the object’s layer that you wish to provide a drop shadow.
- In the Layers panel’s bottom, select the “Layer Style” button (it looks like an “fx” icon).
- Select “Drop Shadow” from the list of layer style options.
- Change the drop shadow’s parameters, including its opacity, size, and distance. Real-time modifications can be previewed.
- Click “OK” to apply the drop shadow effect to the object.
white background photoshop
Step 5:-Adjust the Levels

Then, modify the image’s settings to make the backdrop as white as you can.
Select “Levels” from the “Alterations” menu to achieve this. Move the sliders to the left or right in the Levels dialogue box until the backdrop is as white as possible.
Step 6:-Clean up Edges
After you have adjusted the levels, clean up the edges of your selection by using the eraser tool or the brush tool. This step is important to ensure that the background looks seamless and natural.
white background photoshop
Step 7: Save the Image
Finally, save your image in the desired format. It is advised to save the image in a format that preserves transparency, such as PNG or TIFF, so that it may be reused in later projects without needing to once more remove the backdrop.
Step 8:-Conclusion
Congratulations! You’ve successfully changed the background of your photo to white in Photoshop. With a little practice, you’ll be able to transform all of your images with ease. Don’t forget to experiment with different tools and techniques to find the perfect look for your photos.
white background photoshop
READ ALSO:-How to Edit Photos Properly: A Comprehensive Guide
Step 9:- FAQS
1. Can I use this technique to change the background to other colors?
Ans:- Absolutely, by choosing a different foreground color while filling the new layer, you may alter the backdrop to any color you choose.
2. Can I use this technique on any photo?
Ans:- Absolutely, as long as even the topic is plainly seen, this technique may be applied to any image.
3. How can I make the edges of the subject look smoother?
Ans:- You can refine the edges using the “Select and Mask” tool in Photoshop. You can then reposition the edges to give them a smoother appearance.
4. Does changing the background to white in Photoshop require advanced skills?
Ans:- No, anyone with a working understanding of Photoshop can complete this straightforward operation.
5. Can I change the background to white without creating a new layer?
Ans:- Yes, technically, but it’s best to create a new layer so you may make adjustments without damaging the original picture.


